Google
 

Saturday, November 24, 2007

A gardener gives thanks

Thanksgiving was two days ago. For my non-US readers (Do I have any non-US readers?), Thanksgiving is a day set aside for us to focus on what we are thankful for, as well as a day devoted to getting together with family and friends to eat large quantities of food, especially turkey. As a gardener, I have even more to be thankful for than my non-gardening friends. Here are just a few of those things:

  • My garden itself, with its great variety. I'm fortunate enough to have lots of different growing conditions in my 1/3 acre lot: full sun, part sun, morning sun, afternoon sun, dry shade, damp shade, and woodland. There's a creek too, with boggy soil at one end, which makes my skunk cabbage happy.
    Dangerously close to a skunk cabbage blossom
  • A big white pine that makes one section of the garden smell like a campground in the Sierras
  • The cool bean tepee my husband built for me a few years ago
  • My greenhouse, where I can putter on cold days, start flats of veggies and annuals in the spring, and overwinter my ever-growing collection of citrus trees
  • The pretty yellow daisies that pop up every spring under the Asian pear tree. They came from my husband's grandmother's yard. I don't know what they are, but they're bright and cheery, and the bees like them.
  • Hellebores. In January, when the garden lies barren and asleep, and the mud is so thick I run the risk of sinking up to my knees whenever I set foot on the soil, the hellebores provide a spot of color and a reminder that spring is just around the corner.
    Hellebore Hellebore
  • Tomatoes -- Some years are better for warm-season veggies than others, but tomatoes never fail me completely. One of the greatest pleasures of vegetable gardening is biting into the first ripe tomato of the season, still warm from the sun.
  • The pair of mallard ducks that visit every spring. I don't know where they spend the winter or where they go after they leave our place, but a pair have come every spring since we moved in eleven years ago. They're fun to watch, especially when they're chowing down on the army of slugs that infest my yard (and for which I cannot bring myself to be grateful).
    Mr. Duck
  • Compost. I pile up kitchen waste, weeds, spent annuals, leaves, and old straw, wait a few months, and something magic happens: Instead of the smelly gunk, there's earthy-smelling black compost, ready to nourish the next generation of weeds... er, I mean garden plants.
  • The first sunny weekend day of the year. We usually get ours sometime in February, and it's magical. After two or three months of being inside, I rush out to prepare vegetables, weed flower beds, and boost my vitamin D for a few hours. Despite years of experience to the contrary, I imagine that spring is really here and start making grand plans for getting cool-season crops in early. Naturally the rain returns in a day or two, and I'm back to armchair gardening for another month. But for a couple glorious days, anything seems possible.
  • Bags of leaves and pine needles from the grounds of our church. Each fall church folk rake up and bag these precious materials, and I haul them away. Then I mulch the veggie and flower beds with leaves, and mulch the blueberries and paths with pine needles. Come spring, I have rich soil and few weeds, perfect for spring planting.
  • Seeds. Is there anything in the gardener's world with more potential than a packet of seeds? Anything more magical than seeing the tiny seedlings poke through the soil? Any greater feeling of accomplishment than harvesting veggies you grew from seed?

So often I focus on what's wrong with my garden -- weeds, slugs, and the endless to-do list (pruning, mowing, watering, fertilizing... *sigh*). How wonderful to spend a few minutes thinking about what's right.

Sunday, November 18, 2007

If I had read this book last spring, I might not have time to write this post


(Note: The above link goes to the 1994 ed, but my review is based on the 1989 ed.)

While excavating my spare bedroom a couple weeks ago, i ran across a stash of gardening books I'd bought at a plant sale last spring (Yes, that does tell you how long it's been since I cleaned my spare bedroom. Sad, isn't it?) Anyway, one of them, Winter Gardening in the Maritime Northwest, caught my eye. We're heading into winter, and I'm dying for something garden-related to do. There's always winter sowing, but it's still a bit early (i.e. warm) for that. And of course I could pull weeds, but that isn't much fun.

Back to the book. I curled up with it on a foul, rainy day, with high hopes that it would give me some good ideas for the next sun break. Alas, no. If I wanted to have edible stuff in the garden to play with now, I should have planted it last summer. Bummer. Who thinks to read a book about winter gardening in June? That said, this book is a useful companion for rainy day gardeners, because it includes detailed information about growing a variety of cool-season crops into late fall and, in some cases, winter. Here's an outline of the contents:

Chapter 1: The Principles of Winter Gardening
This chapter covers Northwest climate (especially the difference between the northern and southern regions of our wet little paradise), site (with great info on how to choose sites that will stay as warm as possible during the cold months), some principles of organic gardening, and more.

Chapter 2: Cloches and Frames
In which we learn the various ways to fend off the winter cold with various forms of protection. Interestingly, greenhouses aren't mentioned. I need to find a book on growing edibles in greenhouses in the Northwest.

Chapter 3: Sharecroppers
No, this chapter isn't a digression into agricultural economics in the American South a hundred years ago. Rather, it's a catalog of garden pests and how to deal with them in mostly nontoxic ways.

Chapter 4: Which Vegetables and Herbs to Grow
The longest section of the book, this chapter is an alphabetical list of vegetables and herbs that grow in the cold months, with detailed information on planting times and varieties to choose.

Appendix A gives brief information on winter gardening in other parts of the country, referring to available books on the topic. Appendix B lists winter crops for livestock, Appendix C is a directory of seed sources and organizations, and Appendix D is a list of resources for further reading.

Now I just need to keep my copy handy for when I prepare my seed orders for the spring. So much for instant gratification.

Monday, November 12, 2007

Don't coddle the codling moth

11/25/07: edited post briefly to correct spelling and fix a typo.

Last time I wrote about how to use wormy pears, because I've been too lazy to control the codling moths whose larvae infest my fruit. This morning I read a useful article in Gardens West (a great Canadian gardening magazine that I recommend highly) on how to control codling moths. The article isn't online, unfortunately, but you can buy the issue (October 2007) from their site for $3.18 CAN (about $3.29). I'll include the main points here, but if you want their instructions for making your own coddling moth trap, please buy the issue.

The article includes background on the codling moth life cycle and the damage they do. The codling moth pupates over the winter, then emerges in spring to mate. Females lay their eggs on your fruit tree, sometimes on the fruit itself. When the larvae hatch, they eat their way through your immature apple or pear to feed on the seeds at the core. They leave behind the ever-attractive brown trail made of larva frass.

Brief, immature aside: Have you ever noticed all the clever, academic-sounding terms we have for... um... poop? I hadn't heard "frass" till I read this article (according to dictionary.com, it means "insect excrement"), but now I think I'll throw it around in casual conversation.

Husband: "How was your day?"
Me: "Frassy!"

OK, maybe not.


Back to our entomology lesson... After the larva has feasted on your apple seeds, it emerges to look for a good place to pupate. According to the article,
A safe spot can include cracks or grooves inthe bark of the tree (or any other piece of nearby wood), leaf litter or even just in the soil (pretty much anywhere protected from the ravages of winter weather or predators).
Codling moths are hard to control with insecticides, because the larva is sheltered inside your formerly-appetizing fruit all season. So, according to the article, we have to try different methods:
  1. Constant vigilance and hygiene: Check your developing fruit and destroy any that show moth damage. Other articles I've read emphasize cleaning up around your trees in the fall to get rid of leaf litter and other places the moths can pupate.
  2. Traps: You can buy pheromone traps that will lure horny male moths inside. This gives a whole new meaning to that line from the old Roach Motel commercials: Moths check in, but they don't check out. It's basically a fake no-tell motel for moths. The article includes instructions for making another kind of trap that provides an attractive food source as bait. Those work for both males and females (and there has to be a joke there somewhere, but I'm not going to look for it).
  3. Pheromone distractions -- bits of plastic impregnated with pheromones, intended to confuse the male moths so they can't find the real females. (And yeah, there's probably a joke there too, but I'll spare you).
  4. Trunk banding -- wrap the tree trunk in corrugated cardboard (for exact instructions, see the article) to create an attractive place for the moths to pupate. Once they're tucked away for their winter sleep/metamorphosis, remove and destroy the cardboard. Yes, you too can be the Freddy Krueger of the insect community.
I guess I don't have any more excuses for having frass-contaminated fruit. Since I'm way too lazy for constant vigilance, I think I'll try the pheromone traps and homemade food traps. Mwaaahaaahaaaaa...

Wednesday, October 10, 2007

What to do with less-than-perfect apples and pears

I have a confession to make. I'm a neglectful gardener. Benign neglect is my standard gardening technique for nearly everything, which is why my garden is always weedy--and my apples and pears are sometimes wormy. I know I'm supposed to put out pheromone traps for coddling moths and use dormant spray on my trees. In fact, every fall, when I'm facing a pile of less-than-perfect apples and pears on my kitchen counter, I swear that next year I'll do it right. It's a bit like the drunk who, in the throes of her Sunday morning hangover, promises anyone who will listen that she will never, ever, drink that much again. Yeah, right.

So once again I face a pile of Asian pears that I cannot trust. They look fine on the outside, but I know that about half will have a brown, disgusting surprise in the center. Everyone in my family has learned to cut the pears in quarters before eating them. But there are too many to eat fresh, and I don't want to give them to people I like (or have to face again) for fear of what will happen after they chomp into one first thing in the morning and spend the rest of the day blowing chunks. What to do?

In the last few years I've found good uses for this slightly-substandard bounty. I make jam and pear butter. Lots of jam and pear butter. Then I have Christmas gifts for my co-workers, as well as the friend who pops by at holiday time with no notice, bearing a gift. My family's favorite is pear-apple jam, which captures the sweet scent of ripe fruit and cinnamon (along with the sweet taste of an obscene amount of sugar). I've seen this recipe in several places, including the Michigan State University Extension site. If you peel, core, and chop the fruit by hand, it's a lot of work. I'm lazy, so I use a peeler/corer/slicer gadget designed for apples (which works great on Asian pears since they're the same shape) and a food processor to do the chopping. That makes the task pretty easy, even for a novice jam-maker like me. Here's what you need:
Ingredients for pear-apple jam

And here's what you get:
Pear-apple jam

Yum!

Monday, October 08, 2007

Award-winning horticultural books

As we gardeners contemplate the end of another season, it's time to start looking for some indoor activities to help us pass the cold, dark days (which seem to be starting earlier than usual this year, darn it). One of my favorite winter pastimes is reading gardening books, and I just found a site that will help me pick some good ones. The Council on Botanical and Horticultural Libraries gives an Annual Award for a Significant Work in Botanical or Horticultural Literature. Their site lists the winners back to 2000 with links to press releases that describe the books. The neat thing is that these are books you might not just casually pick up while strolling through your local bookstore. They're a little more specialized than the typical gardening book, but they all look interesting. I'm looking forward to diving into a few of them while curled up in front of my fireplace this winter.

Sunday, October 07, 2007

Flowers, giant vegetables, and even tomatoes -- gardening in the Last Frontier

Back in August, I went to Alaska on vacation. My travelogue is posted on my personal blog, so I won't bore you with that here. Instead, I'd like to share a few garden-related observations from my trip.

  • Anchorage is filled with flowers in the summer, with colorful planters all over downtown. According to the Anchorage Convention and Visitors Bureau, Anchorage is the City of Flowers, with the city planting 461 flowerbeds and hanging baskets every summer.
  • I went to a small farmers market in Anchorage, where I learned about the Alaska Grown movement. Alaska does have agriculture, especially in the Mat-Su Valley. Cool-season crops and berries predominate. According to some literature I picked up at the Alaska Grown booth at the farmers market, the long summer days up there speed growth; 30 days of an Alaska summer creates the same amount of growth as 60 days in more temperate latitudes.
  • Giant vegetables are a big thing (hardy har har) in Alaska--especially cabbages. Several Alaskans have grown world-record vegetables in recent years:

  • Alaskans grow--or attempt to grow--tomatoes. Tomatoes up there need nighttime protection (the temperature dropped below freezing at least once while we were in Anchorage, and we were there in August), but they do grow. I saw several makeshift greenhouses, while I was there, including this one behind an apartment in Whittier:
    How to grow tomatoes in Alaska


I doubt I'd last long up there. I complain because I can't grow citrus in Portland without a greenhouse.

Wednesday, September 19, 2007

What, Me Garden?

Sorry I haven't posted about my garden in several weeks, everybody. We spent the last couple weeks of August and first couple weeks of September painting the outside of our house, which was disasterous on many levels, not the least of which was the loss of all the skin on both my forearms from chemical burns. As well as the brutal slayings of two roses and all the branches and foliage from four medium rhododendrons and a flowering quince.

I began the project with the goal of dutifully covering and protecting all the plants that abutted the siding of the house, and ended the project a few weeks later covered in scratches and bruises from head to toe, and utterly filthy-mouthed from all the cursing I did every time I walked into yet ANOTHER spiderweb (good lord, the spiders have been insane this year!). By the tenth day of this, I had finally lost it -- before my husband even knew what was happening, I'd backed into another spider web on a rhodie and was stomping off to the backyard with a scowl, returning moments later with the big loppers.
What happened next can best be described by analogy: you know that scene in Kill Bill when The Bride unleashes a samurai sword on a group of, like, 88 ninjas? Picture that scene, only I was in paint-covered shorts with a bandana over my hair instead of a sexy yellow jumpsuit, and the ninjas were quinces and roses and rhodies. Though the tool of destruction was different, the carnage was pretty much equivalent. And the fury-based action, totally identical. Right down to the backflips (okay, not really).

Now, a week or two after it's all finally ended, I do confess to some guilt about all this. Though I've been reassured by a master gardener friend that my plants will all survive the brutal attack, I can't help but wonder if they will ever trust me again. I had spent the first two years in our house nursing one of those rhodies back to health, after all, coaxing it back to glory with gentle words and regular fertilizing and watering. And then one spiderweb too many, along with a nasty gash on the back of my lower leg when I stepped off the ladder onto another one of its sharp branches, and the next thing it knew, I'd unleashed my inner Uma Thurman on its arse.

I confess I am not known for my patience.

In any case, the house sure looks great, even though the same can't be said for the plants around it. And, happily, the vegetables I had planted along the siding were spared my wrath (they weren't as sharp nor as likely to feature enormous spiders the size of my head). We ate our first zucchini the other day, which was pretty exciting since last year, our zucs never did much of anything. And we've got about six more of those coming in, as well as three jalapeno peppers that could probably be picked and turned into nachos as soon as we're ready. Tomatoes are still looking good, too. Ooh, and our strawberries! They have been fantastic, and they just keep coming! (I think the secret for those was definitely pots this year too, by the way, because we haven't had any slugs at all this time around, and last year lost a lot of berries to the little slimers.)

And now I'd like to leave you all with a question, to stimulate some comments and conversation. What do you guys do with your garden in the fall? Do you plant new stuff (if so, what?)? Do you just yank everything out and put the tools away until spring? I'd love to do something with our raised beds this winter besides just let them sit there looking lonely and bored. Got any suggestions?

Friday, August 17, 2007

Forget business school -- plant a garden!

I just ran across an article in Fast Company called Unearth Growth By Digging in the Dirt. It's not a gardening article, but I thought it would be fun to post it here anyway. The author's premise is that business is more like gardening than war or sport, the two most common sources of business-related metaphors. He makes some good points about both business and gardening, my favorite of which is:

Gardening has no end. There is no finish line. It is about a journey not a specific destination.


I think he left out a couple things that apply to both gardening and business, though:

  • Gardens and businesses both need regular, careful attention. You'll have a much nicer garden if you spend a few minutes a day on it rather than several hours a couple times a month. Without regular attention, pests and problems fester, and what would have been a little job becomes a major one. The same is true of business, or work life more generally. File that one under Lessons I Learned from Bindweed.
  • You can't nurture every plant carefully, but some are worth the extra trouble. If you have an entire garden full of fussy plants, they will drive you crazy. Time and energy are limited quantities. But some plants are so spectacular, they're worth some extra trouble to grow. I've found the same is often true of employees. File that one under Lessons I Learned from Citrus Trees.
  • Not all plants are the same. Each species has unique needs, and sometimes individuals within a species differ from one another. A little observation to see what makes a particular specimen thrive can pay big dividends. Likewise, each person (employee, co-worker... whomever) in the workplace is a unique individual. Take the time to get to know each person and what makes him/her tick, and you'll work with others more successfully. File that under Lessons I Learned from Almost Every Plant I've Ever Grown.


Now put down that business book and pull some weeds!

Thursday, August 16, 2007

It's tomato time!

It's truly summer: A couple weekends ago, I harvested (and promptly ate) my first homegrown tomato of the season. It was a cherry tomato from one of the vines I'm growing in hanging baskets on my deck:
Hanging basket cherry tomatoes

These are a variety called Tumbler, available from Totally Tomatoes. It's a determinate hybrid bred for compact growth, so it does well in containers. I also grow full-size tomatoes in the ground, including several heirloom varieties. The full-size tomatoes have been slow to ripen, especially since the weather has turned cool these last two weeks. I should have some any day now, but in the meantime I can raid the hanging baskets for my homegrown tomato fix.

Because tomatoes are so popular with gardeners, there's lots of lore related to growing them. Every tomato grower has his or her favorite varieties and tips for success. Mine are below. But keep in mind: What works in one area may not work in another, due to differences in climate, soil, pests, etc. And, what works for one gardener may not work for another. Experiment, find what works, and tell other gardeners about it! You can start by leaving me a comment--I'm always looking for ways to do things better.

Janet's tomato tips

Soil and mulch: I grow my tomatoes in clay soil amended with compost. In addition, I mulch my tomato plot with about 6" of leaves every fall after removing the dead vines. These break down over the winter, adding organic matter to the soil while suppressing early spring weeds and keeping the soil from being compacted by our winter rain. When it's time to plant tomatoes (on or after Mother's Day here in Portland), I rake the remaining mulch back from about a 1' circle, in the center of which goes a tomato seedling. I add more mulch, usually straw, to the pathways between rows to suppress weeds and hold in moisture.

Fertilizer: While I try to garden organically most of the time, I'm not a purist. I use time-release chemical fertilizer for my tomatoes, usually Miracle-Gro. About a half teaspoon per plant does the trick.

Eggshells: After planting my seedlings, I surround each one with about a 4" circle of eggshells, which we save throughout the winter and spring. They serve two purposes. First, they keep slugs away. Apparently the sharp shells are uncomfortable for the evil little mollusks to cross. Second, as they break down, they add calcium to the soil throughout the growing season. The calcium helps prevent blossom end rot, a common problem with certain types of tomatoes, especially Roma. Since I started using eggshells a few years ago, I've had only one tomato with blossom end rot, and it was a mild case. Before the eggshells, about half my Romas would be affected, along with plenty of other varieties too.

Water: Tomatoes, like most plants, do best with deep, infrequent watering. My amended clay soil holds moisture well, so I can usually get away with watering once or twice a week unless it's really hot.

Please leave your tomato-growing tips as comments, so we can all learn from each other.

Monday, July 30, 2007

Plant Diseases, Horti-Hypochondria, and Pirates Named Blackleg

One of the first books I got when I started gardening was given to me as a gift. It was the Western Garden Problem Solver book put out by Sunset Magazine, and to this day, I'm not sure the gift-giver, otherwise known as "Mom," had any idea what fresh hell that book was going to bring the gift-recipient, otherwise known as her "certifiably crazy daughter."

That would be me.

Initially, I found the book kind of entertaining, in the same gross-out way I used to find my friend Danya's father's medical books when I was a kid. You know the books I mean -- the ones with all the pictures of grotesque skin conditions and swollen body parts and lungs with cancer and whatnot. The Western Garden Problem Solver book is essentially the gardener's equivalent of those medical books, complete with photos that make you want to barf and diseases with names that sound absolutely horrific in a rather delightful sort of way (to me anyway -- I loved being grossed out!): Blackleg, Fire Blight, Scab, Shot Hole, Slime Flux, Stripe Smut, or the particularly-ominous "Sudden Oak Death." (Incidentally, it is just me, or could many of these double as pirate names?)

The more I looked through the book, though, and the more I poked around in my yard, the more unnerved I began to get. Pretty soon, I had turned into the gardening equivalent of a medical student, told to think horses when hearing hoofbeats, but thinking zebras every time anyway. Every plant in my yard suddenly had some elaborate, elusive disease. The roses had black spot and rust. The pears, I was sure, had necrotic leaf blotch. And my pink dogwood -- my favorite tree in the entire yard -- was suddenly dying right in front of my eyes from something called "anthracnose."

Despite the way it sounds, anthracnose is neither the latest al Qaeda threat, nor an extraordinarily bad 80's metal band. Instead, it's an utterly awful fungus that "causes considerable tree defoliation" and features "watery spots" with "spore masses" that contain "light pink slime."

In a word: ew.

Anyway, after finishing the book's chapter on anthracnose and then Googling the term for even more creepy information, I became utterly convinced my tree would never see another spring. Desperate, I finally broke off a small branch with infected leaves and took it into a master gardener friend of mine. Here's a transcript of our conversation:

Me: Look at this! [thrusts branch in friend's face] It's anthracnose, isn't it.
I KNOW it is. Oh god! My tree is dying of anthracnose!

Friend: [examines] Hmmm. This doesn't really look like anthracnose to me. In fact, it kinda looks like leaf scorch. How often are you watering this tree?

Me: [pauses, looks perplexed] You're supposed to water trees?

Well heck, people! Nobody ever told me that! I guess I just assumed for trees to have gotten that big to begin with in this world of sloth and iPods, they would've evolved out of the need for complimentary beverage service by now. I mean, honestly. My dandelions and blackberries never seem to need any water to flourish -- you're telling me trees can't do a better job than DANDELIONS and BLACKBERRIES? Whatever, man.

In any case, for the first six months I owned the Western Garden Problem Solver book, I showed up at my friend's door with all kinds of horrible-looking flowers and leaves, convinced every time I was single-handedly killing off every plant in my garden with some Smut or another. By the mid-year mark, she had started to roll her eyes before I even opened my mouth and finally gave MY disorder a rather apt moniker itself:

Yes, people, it's true -- the Western Garden Problem Solver (on sale at Amazon.com for only $4.99!) has turned me into a full-fledged horti-hypochondriac. Take two daisies and call me in the morning. And, my god, whatever you do, don't let the pythium root rot get you too.

Monday, July 23, 2007

Feed Me, Seymour!

Growing up with a mother who gardened taught me at an early age the pleasures of ripe tomatoes eaten right off the vine in the backyard on a sunny afternoon. There's just nothing like them -- not only the most perfect flavor and texture, but, warmed by the sun, the most perfect temperature too.

So, when I grew up and began living on my own, the first thing I wanted to plant was tomatoes. I lived in an apartment then, though, and while I tried for a few years to grow them in pots on my (pretty shady) balcony, I never really had any success. I'd get maybe three or four little cherry tomatoes total, and the plants would never get very big or healthy-looking.

I blamed the pots.


When we got our house with its lovely yard three summers ago, I knew, KNEW this was finally going to be it. I would finally have tomatoes in the summer right out of my backyard! Too eager to wait until the following year, I put three plants in immediately. It was mid-June by then, though, and, well, they did about as well as the apartment ones had.

I blamed late planting.

The NEXT summer, I planted on time, used fresh soil in the garden beds, and watered verrrrry carefully, convinced this would finally be the Year of the Tomato. My plants started out looking great, but they just never really grew and eventually kind of fizzled out completely.

I blamed the trees that got too big and shadowed that end of the bed.

Finally, THIS year, I decided to quit monkeying around and ask for some professional help. I talked to a master gardener at the nursery, and she convinced me to give pots another try. Heeding her advice, I bought three enormous black plastic pots (black plastic being best for developing really hot soil, she said), and I planted one plant in each one -- two cherry varieties, and one Roma. New soil, great looking starter plants, hot dirt (woo woo!), and the ability to move the pots into the most sunshiny-est spot in the whole yard. What could possibly go wrong?

Answer: gah, EVERYTHING! Weeks later, while we had a few little measley cherries coming in, the plants were still small and not very healthy looking. The Roma had barely grown at all and the other two were yellowing (a sign of too much water) and also browning (a sign of too little -- I give up!).

In defense of my wanna-be-green thumb, all the Seattlites I've talked to in the last month or so about this have said they've never had any success growing tomatoes up here either, despite the fact all of us have friends in Oregon -- not that far from here! -- who boast about having so many fresh tomatoes in late summer they eat their fill and STILL have plenty left over to pelt at Republicans (Portland is a very liberal town, for your non-Northwesterners). So, while I've been feeling really disappointed lately and about ready to throw in the towel on this dream for good, I also haven't been feeling all that responsible.

I blamed geography.

But you guys, guess what! Three weeks ago, in a last ditch effort, I bought a small box of Miracle Gro specifically designed for tomatoes (they'd been fed a more general "vegetable" blend earlier in the summer). I mixed 1.5 tablespoons into my large watering can (raising an eyebrow when I saw the mixture turn to pink foam -- I'm putting weird pink foam on my edibles??) and followed the instructions, which said to sprinkle it on the foliage first and then soak the soil. I closed my eyes, sprinkled, soaked, and refilled the can twice more with pink foam for the other two pots. And, a week later, I did it all again.

Last week, it rained here almost every day -- nearly breaking the record for the most rain we've ever gotten in July. I barely went out to the garden the whole time, as I knew nothing needed any watering, that was for sure. But yesterday, taking a break from an entire day spent with the new Harry Potter book and my sofa (Hi, Janet! Me too!), I went out to deadhead my limp, rain-blasted petunias, and . . .

H-O-L-Y C-O-W

The first thing I noticed was that the Roma looked a little bigger and kind of lopsided. Getting closer, I realized it was more like a LOT bigger, and was lopsided because it was covered in heavy green tomatoes!

And the two cherries! Both have begun to pop out of their cages, and one I actually had to stake with a large rake because I didn't have anything more appropriate that was tall enough! They are COVERED in dozens of tomatoes -- COVERED!

Do you guys remember that show Perfect Strangers and Balki's "Dance of Joy"? Yep, that was me in my backyard yesterday afternoon. Victory! It is so sweet! Almost as sweet, as a matter of fact, as MY MILLIONS OF TOMATOES!

Was it the plant food? Was it the heat wave followed by the monsoon? Was it just their time to go nuts? The pots? The soil? I have no answers. But I suddenly feel like a ballplayer on a winning streak who becomes afraid to change his socks lest the streak be broken. This combination may be the magic secret to growing tomatoes in Seattle!

So, if you live up here too and have longed to feel the sun-warmed burst of a ripe cherry tomato on your tongue, get some huge black plastic pots (I want to say ours are 8 gallons, but I can check if anybody wants me to), put one plant in each pot, use Miracle Gro for tomatoes, place in direct sun, water too much AND too little at the same time (good luck with that one), sacrifice a live goat, cross your fingers, and do a rain dance in mid-July.

Let me know if it works for you too.

p.s. I was kidding about the goat.

Sunday, July 22, 2007

Poisonous plants at Hogwarts

(image from europealacarte on Flickr, used under Creative Commons license)

Unless you've been living under your mulch with the slugs for the last year, you know that this is Harry Potter weekend. The seventh and final tale, Harry Potter and the Deathly Hallows, came out yesterday, which means that one of your trusty bloggers (that would be me) spent a perfectly good weekend gardening day lounging on the couch reading. Today, having finished the book (don't worry--you'll get no spoilers from me), I'll get back to work. But first, let's visit the Hogwarts garden!

(image from roger on Flickr, used under Creative Commons license)

Today's Oregonian has an article in the travel section on the garden at Alnwick Castle, which serves as Hogwarts for the Harry Potter movies. About half of the article is devoted to the Poison Garden, which features a hissing copper snake, Schedule 1 narcotics, deadly nightshade, hemlock, and lots of other fascinating but toxic plants. The article includes an important point for all of us gardeners to remember:


Alison Hamer, the garden's learning and development manager, said visitors are often surprised to realize that they have many of the poison plants, such as foxglove and azalea, growing in their own backyards. Others can easily be found in the wild. And they are as easy to grow as weeds.


I remember getting into an e-mail discussion with someone on PDX Plantswap once about poisonous plants. She was afraid to grow daphne, because she had young children. I certainly wouldn't question someone's decision to keep their children safe, but I did gently remind her that many of our common garden plants are poisonous, including tomato vines and the aforementioned azaleas. So unless you're willing to rip up most of your landscape, there's no substitute for teaching children at a young age not to eat anything in the garden that they don't recognize. My son likes to graze on fresh herbs, especially mint, so he got taught this lesson early. I point out the especially poisonous plants (like the castor bean growing on my deck), but he never touches anything he isn't sure is OK.

I know there are children who will put anything in their mouths, so whether or not to grow poisonous stuff must be an individual decision. But my point is, even if you avoid the infamous ones like castor bean and foxglove, there's probably still something toxic in your yard. And we don't want to discourage children from hanging out in the yard, because we want them to mow the lawn when they're older, right?

Stepping off my soapbox to return to the Alnwick Castle garden:

And if any of you readers out there are planning a trip to Alnwick Castle, may I stow away in your suitcase?

Wednesday, July 18, 2007

An Introduction to Meg, Your Newbie Garden Blogger

Hello, Rainy Day Gardening readers! Janet and I recently met via email when we got started on a library-related topic and quickly went off on a tangent about plants. After a few back-and-forths, she asked me if I'd like to write for her gardening blog, and I said I'd have to think about it, waited approximately 4.2 seconds, and then said I'd LOVE to!

A little bit about me: I'm a substance abuse/addictions librarian living in Seattle, Washington. My husband and I bought our first house three years ago and as it had an utterly spectacular yard, I took up gardening. The first summer was a bit of a wash in terms of actual planting -- we moved in in June and I wanted to see what the previous owner had put in before making any radical changes. That winter, I read lots of gardening books and tried to learn as much as I could before spring. And that following summer, I quickly learned there's a whole lotta stuff about gardening they don't tell you in the books.

A few examples:

1. Running both the front- and backyard hoses at the same time you do a load of laundry means you can't flush the toilet.

2. Just because it was sunny on that spot in the yard LAST summer does not mean it'll be sunny there NEXT summer (darn trees!).

3. On the 8th day, God created blackberries. And when He saw what He had done, he snorted at Adam and Eve and said, "Suckers."

4. If you pull out fifty dandelions in the "yellow flower" stage and leave them in a heap on the side of the yard for three days because you are too lazy to put them in the yard waste bin, they will continue to develop to the "puff ball" stage, and soon, all your hard work, sweating, and inappropriate language will have been for naught.

5. Slugs can climb up the sides of pots. And I am also pretty sure they can fly, despite physical evidence to the contrary.

6. Peas are fun and relatively idiot-proof (for evidence, see photo above).

My gardening posts here will primarily focus on mistakes I have made, things I've learned (usually the hard way!), and triumphs I may or may not experience, depending on soil quality and weather conditions. I hope you readers will enjoy getting our two perspectives on gardening: Janet's, a seasoned veteran, and mine, a total rookie. Please comment freely and vigorously on any and all of my posts -- I will surely need as much advice and coaching as possible!

My camera is currently on the fritz (as are my zinnias -- coincidence?), but I hope to include more photos of my garden in future posts. Stay tuned!

Monday, July 16, 2007

Old mess becomes new compost heap

You know how there's an area in almost every garden that's a big ol' mess? You avert your eyes as you walk past, because you don't want to see it, but you don't want to deal with it either? Well, I have a lot of those in my yard, but I now have two fewer than I did a couple days ago. Big Mess #1 was an area about 7' x 4', which contained a huge dead rhododendron, a volunteer poplar seedling, a bunch of bindweed, and my mother's collection of old nursery pots. I've had my eye on the space for a couple years as a place for a Nelly Moser clematis and some other pretty flowers, but I just didn't want to deal with the mess. Take a look at this pic to see why:
Before the sheet mulching project

Saturday, however, I decided I'd had enough. With a little help from Husband, who yanked up the rhodie skeleton and poplar seedling, I had the area cleared in about a half hour. Then it was time to employ my favorite lazy gardening technique, sheet mulching (see my previous posts on that topic for more info on that technique). Down went a thick layer of newspaper, followed by two big bags of leaves left over from last fall. Here's a pic of the project in progress:
During the sheet mulching project

Since I plan to convert this area to a planting bed next spring, I need to improve the soil. I have also filled all three of my compost bins, so I was on the lookout for a place to start another compost heap. Hey, I thought... let's solve both of those problems! The site of the former Big Mess #1 is now home to my newest compost heap! And just in time, too, because today Son and I decided to tackle Big Mess #2, the huge strip of horsetail growing along the west side of our property. All that horsetail, along with some other weeds, is now rotting away in its new home:
0716071511.jpg

So what's the point of this story (besides a little public bragging about how much work I did this weekend)?

  • Sometimes those big garden jobs that we put off really aren't that big. It took me a whopping 30 minutes to clear out that mess. Why did I wait so long?
  • You don't have to spend a lot of money or do a lot of digging to get a new area ready for planting, especially if you're willing to wait awhile for nature to do the work.
  • Make composting as easy as you can. Why haul the debris to the pile, then haul the finished compost to where you need it? Either pile up your debris near where it originally grew, or build your pile where you're going to need compost in a few months.


Happy gardening!

Sunday, July 15, 2007

My hazelnut tree is expecting!

P1030092

My hazelnut tree, which I raised from a seedling, finally has nuts on it! There are only two of them, but I'm still excited. Every year for the last few years I've checked the tree for signs of nuts, only to be disappointed--and now it finally has some. Here they are--aren't they cute?

P1030094

This pic shows the immature nut inside the husk:
P1030096_cropped

Where I live used to contain a hazelnut orchard many years ago (or so the neighborhood old-timers tell me), so there are lots of hazelnut trees in the area. The squirrels bury the nuts and forget to eat some of them, so they sprout, and we end up with lots of hazelnut seedlings in the yard. I decided to keep a couple of them, one male and one female. The male has been producing catkins for several years, and now the female is finally reproductive age too. Yay! My hazelnuts have reached puberty!

Hazelnuts are very easy to grow, though it can be a challenge to find trees for sale or even to find information on growing them. A Google search turned up a few links with information, including these two:


Neither gives clear growing instructions, so I'll include some here.

Growing conditions
Hazelnut (a/k/a filbert) trees are understory trees, so they can tolerate some shade. Mine grow in anywhere from nearly full sun to half shade. They're extremely low-maintenance, requiring little to no supplemental water here in Portland. They appreciate a little fertilizer but don't require it. They seem fine with our local heavy clay soil, though I mulch mine with compost and fall leaves.

Males and females
A male and female are required for nuts, and only females produce nuts (I'm sure there's a joke in there somewhere, but I'm not going to search for it). As long as there's a male tree somewhere in the area, the female should bear. I'm not sure how close together they need to be; mine are about 40 feet apart, but I don't think they need to be that close. When they are seedlings, males and females look the same. After a few years, males will start producing catkins (sort of furry, worm-like things, about 2-3" long--there's probably a joke in there somewhere too) in late fall. These will hang on the bare branches throughout most of the winter. I don't have any pictures of my male hazelnut, but there are a few good ones on Flickr, including this one.

Getting trees
As for finding trees... good luck. Until recently, it was illegal to sell hazelnut trees in Oregon or ship them to Oregon, because of efforts to control Eastern Filbert Blight. The ban was lifted a couple of years ago, when attempts to control the disease proved futile. The change wasn't well-publicized, however, so most nurseries still don't sell them. So how do you get one?

  • If you know someone with a filbert, you can ask for a sucker from it (they spread into thickets).
  • If you live near filbert trees, you'll probably end up with seedlings in your yard, but you may mistake them for weeds, as I used to. A Flickr seearch on hazelnut leaves turns up some pictures that can help you recognize baby trees. If you aren't sure, gently dig up a likely candidate and check the roots for the remains of the hazelnut. If the seedling is small (less than about 12" tall), part of the nut should still be there.
  • If you don't want to go to all this trouble, leave a comment with your email address, and I'll make arrangements to send you some seedlings. I have several in my yard that I need to dig up.
  • Finally, you can grow your own from fresh, raw hazelnuts. Just bury the nut and wait. But be patient. My female filbert is about 6 years old, and it's just now starting to produce nuts.

Tuesday, June 26, 2007

Snake in the compost bin!

So I was trying to be a Good Organic Gardener this evening, watering the compost bin so the stuff will break down properly, and I ended up giving a snake a shower! Apparently a garter snake had taken up residence in the compost bin, and it didn't seem too happy with the blast of cold water. Down to the bottom of the pile it went. Ah, well... I wish it good hunting. Lots of insects in that bin.

Sunday, June 10, 2007

Carnivorous pitcher plants on parade

In case you, dear readers, have not yet realized that I'm a little strange, this post should convince you. For the last four years or so, I've been growing carnivorous plants, mostly North American and Asian pitcher plants and a few flytraps. The flytraps didn't like our winter this year, so a lot of them didn't make it. But the pitchers are lookin' good. The Asian pitchers, (Nepenthes), grow in my kitchen window, some in hanging baskets and others on the windowsill. The North American pitchers (Sarracenia) prefer to be outside, so they grow in pots on my deck. This is the time of year when they look their best, especially the North American pitchers. They've woken up from their winter sleep, and they're flowering and producing lots of new pitchers. Here are a few pics:


Sarracenia

Sarracenia

Sarracenia purpurea in bloom

And closeups of a couple flowers:

Sarracenia purpurea flower

Bloom on carnivorous pitcher plant

The Asian pitchers don't go dormant in winter, but they do stop pitchering. Mine are just starting to produce new pitchers:

Nepenthes

Nepenthes

Nepenthes burbidgeae

The most common question I get about these strange plants is, "Do you have to feed them?" I do feed the indoor ones. Pity the hapless insect that finds its way into my house. It will be stunned with a rolled-up newspaper and popped into a Nepenthes pitcher faster than you can say, "Dinner time!" The plants that are outside catch plenty of their own food. Some of my larger pitchers will be filled to the top with insect carcasses by the end of the summer. One of the first things I learned when I started growing them was, Never look inside the pitchers! You don't want to see what goes on in there, but it would make a great arthropod horror movie.

If you're one of the few people who thinks all this is cool rather than disgusting, I recommend you get a copy of The Savage Garden, which will tell you all you need to know about growing carnivorous plants:


And if you're ready to grow some of your own, I recommend Sarracenia Northwest, an online carnivorous plant nursery based here in Oregon: http://www.cobraplant.com/cmd.php?af=382064

Saturday, May 19, 2007

It's May, and the gardening is sweet!

What a fantastic time of year to be a Northwest gardener! Plants are fairly bursting out of their beds with an exuberance matched only by the weeds, blooms are everywhere, the soil is warming up enough for warm season vegetables... and my to-do list is so long that merely reading it exhausts me. But it's my favorite time of year in the garden, and I only wish I could take the month off from work to garden full-time.

This post will provide a quick update on the garden, and that's about it. After all, it's Saturday, and there's gardening to do!

Veggies
Asparagus has been bearing for a few weeks and still going strong. Hubby didn't harvest during the week I was out of town, so there are already a couple of fronds that are about 4 feet high.

I harvested some radishes a couple weeks ago and another bunch last night. Radishes are great for people like me who like instant gratification.

Lettuce is doing well... when I can keep the slugs off it. I can start harvesting a few leaves this weekend, with more to come.


Flowers
Columbine is blooming and really jazzing up my woodland garden. Here are a few pictures:
Columbine Columbine Columbine closeup Columbine

Meadow rue -- weird-looking but pretty:
Meadow rue

Rhododendrons -- some are in full bloom, and others are just getting started:
Rhododendron Rhododendron

Miniature roses are gorgeous:
Miniature rose Miniature rose

I took the citrus trees out of the greenhouse a couple weeks ago, and most of them are blooming like crazy. My front yard smells like citrus blossoms -- heavenly!
Lemon blossoms

And finally, the carnivorous pitcher plants are coming out of their winter sleep. They have strange-but-cool-looking flowers:
Bloom on carnivorous pitcher plant Bloom on carnivorous pitcher plant

The peonies have buds on them, and my white lilac just finished blooming.

There's lots to do in the garden. Next up: Planting the warm season veggies (beans, tomatoes, cucumbers, peppers, squash, and melons). This weekend I hope to get the beds manured and ready, with actual planting planned for next weekend. Busy, busy, busy!

Friday, April 06, 2007

The perfect Father's Day gift??


When I first saw this, I thought it was an April Fools joke, but no, it's a real product. Check out the Weed Flame Torch Kit. Yes, instead of pulling or hoeing weeds, you can burn them with a 100,000 BTU torch! They also make a 500,000 BTU model for those of you with higher-than-average testosterone levels. ROTFLMAO! I've always said I thought flamethrowers would make excellent gardening implements, but I was *joking*.

Rita Rudner says men will cook if there's danger involved (hence the thriving market for gas grills). But will they garden if there's danger involved?

How about it guys? Would you use this thing?

Monday, March 26, 2007

A few random updates and observations

I always think of ideas to post here, but in order to do the thing right, I need pictures and a coherent narrative. Both of those require a bit of time and effort, though, which usually stops me cold. So tonight's post will consist of a few random things, and if there are illustrations (there probably will be), they'll be pictures I've already taken and posted to Flickr. Here we go...

It's finally spring here in Portland! Daffodils are in full bloom, my red flowering currant is gorgeous (sure wish I had a pic handy), and the flowering quinces and hellebores are on the wane. But I do have a hellebore pic from about a month ago to share:

Hellebore

Now that it's spring, I have to get serious about garden chores. Last week I spent an afternoon planting tomatoes and peppers. The challenge for me is where to put them. I have a greenhouse, but it isn't warm enough to germinate warm-season veggies this early in the year. I usually put seed flats on top of my reef tank, where the lights under the lid provide about 85 degrees of bottom heat. I get really fast germination, but then I have another problem... where to move the seedlings? There isn't enough light on top of the aquarium, so I have to find a new location. I have shop lights in my spare bedroom closet, a 20-gal aquarium with fluorescent lights in my bedroom, and a 4-shelf mini greenhouse against a south-facing wall on my deck. The mini greenhouse is perfect for cool season crops (unless we get unseasonably warm weather; then they fry), but it usually doesn't work well for warm season stuff till late April. That leaves the indoor options, in which I can house about 5 flats. That's never enough space.

In the meantime, I decided to clean the dead stuff out of my big greenhouse, so I could eventually move seedlings there. Last fall I had the brilliant idea to dig up my pepper plants and put them in the greenhouse. Peppers are tropical shrubs, so I hoped they'd winter over. They didn't. The bouganvilla and mandevilla bit the dust too during our 20-degree cold spell. Even with 2 heaters running, I couldn't keep the greenhouse above freezing. *Sigh* But now that all the plant corpses have been composted, I have a bit more room. I'm sure I'll fill the space with something, probably very soon. The First Law of Greenhouses is that plant collections expand to fill all available space.
Publish
That's a sufficient update for now. Hopefully it won't take me 2 months to post again. And heck, maybe I'll even have pictures next time.

Tuesday, January 16, 2007

Let it snow!

I don't have anything of great substance to say today, but I'd like to share some pics from our first real snow day of the winter. People who live in cold, snowy places probably get tired of seeing their gardens shrouded in white, but it's a lovely novelty here in Portland.

Here's the front of my house:
P1010177

The creek in our backyard, a/k/a our naturescaping project:
P1010182

Our neighbor's blue spruce -- too bad Christmas is over
P1010187

Interesting texture:
P1010194

Snowy sword fern, a common site when it snows in Western Oregon:
P1010195

And finally, the purple pitcher plant on my back deck (Sarracenia purpurea). Sorry dude... no bugs for you today!
P1010208

Monday, December 11, 2006

Now this might convince you to give up pesticides!

A post on Garden Rant talks about a recent study linking pesticide use to smaller penises and low testosterone levels in male alligators and abnormal ovaries in female alligators. A comment on the post links to a study from the U of Missouri suggesting that sperm problems in human males could be related to agricultural chemicals. Here's a summary of the findings:
Semen quality was equally high in Minneapolis and New York, and slightly lower in Los Angeles. However, men in mid-Missouri had counts and quality that were significantly lower than men from any of the urban centers.
Scary stuff.

My garden has been pesticide-free for several years now, except for slug bait (and I use mostly iron phosphate now), and I haven't had any insect problems that a good dose of Safter soap couldn't fix. No, my plants don't look perfect, but they grow well.

God's take on lawns

Two posts in 10 minutes? A new record! But I just found a great piece on GardenWeb which is worth reposting here. Think about this when it's time to whip out the lawn mower next spring:

GOD'S TAKE ON LAWNS:
Imagine the conversation The Creator might have had with St. Francis on the subject of lawns:

God: Hey St. Francis, you know all about gardens and nature. What in the world is going on down there in the Midwest? What happened to the dandelions, violets, thistle and stuff I started eons ago? I had a perfect "no maintenance" garden plan. Those plants grow in any type of soil, withstand drought and multiply with abandon. The nectar from the long lasting blossoms attracts butterflies, honey bees and flocks of songbirds. I expected to see a vast garden of colors by now. But all I see are these green rectangles.

St. Francis: It's the tribes that settled there, Lord. The Suburbanites. They started calling your flowers "weeds" and went to great lengths to kill them and replace them with grass.

God: Grass? But it's so boring. It's not colorful. It doesn't attract butterflies, birds and bees, only grubs and sod worms. It's temperamental with temperatures. Do these Suburbanites really want all that grass growing there?

St. Francis: Apparently so, Lord. They go to great pains to grow it and keep it green. The begin each spring by fertilizing grass and poisoning any other plant that crops up in the lawn.

God: The spring rains and warm weather probably make grass grow really fast. That must make the Suburbanites happy.

St. Francis: Apparently not, Lord. As soon as it grows a little, they cut it... sometimes twice a week.

God: They cut it? Do they then bail it like hay?

St. Francis: Not exactly, Lord. Most of them rake it up and put it in bags.

God: They bag it? Why? Is it a cash crop? Do they sell it?

St. Francis: No Sir. Just the opposite. They pay to throw it away.

God: Now let me get this straight. They fertilize grass so when it does grow, they cut it off and pay to throw it away?

St. Francis: Yes, Sir.

God: These Suburbanites must be relieved in the summer when we cut back on the rain and turn up the heat. That surely slows the growth and saves them a lot of work.

St. Francis: You are not going to believe this Lord. When the grass stops growing so fast, they drag out hoses and pay more money to water it so they can continue to mow it and pay to get rid of it.

God: What nonsense. At least they kept some of the trees. That was a sheer stroke of genius, if I do say so myself. The trees grow leaves in the spring to provide beauty and shade in the summer. In the autumn they fall to the ground and form a natural blanket to keep moisture in the soil and protect the trees and bushes. Plus, as they rot, the leaves form compost to enhance the soil. It's a natural circle of life.

St. Francis: You better sit down, Lord. The Suburbanites have drawn a new circle. As soon as the leaves fall, they rake them into great piles and pay to have them hauled away.

God: No. What do they do to protect the shrub and tree roots in the winter and to keep the soil moist and loose?

St. Francis: After throwing away the leaves, they go out and buy something which they call mulch. The haul it home and spread it around in place of the leaves.

God: And where do they get this mulch?

St. Francis: They cut down trees and grind them up to make the mulch.

God: Enough. I don't want to think about this anymore. Sister Catherine, you're in charge of the arts. What movie have you scheduled for us tonight?

Sister Catherine: "Dumb and Dumber", Lord. It's a real stupid movie about.....

God: Never mind, I think I just heard the whole story from St. Francis.

Armchair tomato gardening

OK tomato gardeners, it may be cold and grey outside, but we can still indulge our passion for love apples. Ronni Lundy's In Praise of Tomatoes: Tasty Recipes, Garden Secrets, Legends & Lore offers an excellent opportunity to daydream about last year's tomato patch while learning something that may help us with next year's crop. If you're looking for a guide to growing tomatoes, look elsewhere. But if you'd like to learn about the history of this popular garden vegetable, get some new--and creative--recipes, and admire some gorgeous full-color illustrations, this is the book for you. It includes a useful chart of tomato varieties that gardeners will find helpful, but otherwise the emphasis here is not how to grow tomatoes, but why to grow them. After drooling over recipes for green tomato ketchup, red tomato and lemon jam, and spicy red tomato cake, I'm ready to start planning for next year's crop.
Sunday, December 10, 2006

How to Root Softwood Cuttings - Plant Propagation Forum - GardenWeb

I just stumbled across a great posting on GardenWeb that explains how to root softwood cuttings. It includes very basic instructions and pictures -- perfect for beginners. Take a look: Easy - How to Root Softwood Cuttings - Plant Propagation Forum - GardenWeb

Sunday, November 19, 2006

10 Easy Soil Tests

Another gem from Organic Gardening - 10 Easy Soil Tests. These sound like a great way to better know your soil.

Another tip for lazy gardeners, courtesy of Organic Gardening

Interesting coincidence. Yesterday I explained my lazy composting/mulching method. This morning my e-mail newsletter from Organic Gardening includes a link to their Simple Composting Method.

So, if you're lazy like me, now you have another option.

Saturday, November 18, 2006

Cheap, lazy gardening tip: mulch with free stuff that's easy to get

I just spent a couple of hours mulching my front yard with stuff that cost me nothing but a bit of effort. This morning our church had its annual leaf-raking party. Hubby and I hauled away all the leaves and pine needles, saving the church the hassle of getting rid of them and furnishing us with lots of great mulch. We had also been stockpiling newspapers for a few months, so we had everything we needed to enrich the soil and assure a mostly-weed-free yard in the spring. I cleared away any noxious, invasive weeds (bindweed, crabgrass, etc.) and laid down thick pads of newspaper (at least 8 layers thick; preferably thicker). Then I poured leaves on top. No need to shred the leaves first. Whole leaves will break down slowly all winter, feeding the soil and providing a thick weed barrier.

Because pine needles are acidic, I use them only around acid-loving plants like rhododendrons or blueberries, or I use them to mulch pathways, areas under big trees, or other places where I don't plan to plant anything for awhile. A layer of newspaper under pine needles really isn't necessary unless you have a major weed problem. And you don't want to put newspaper under pine needles when making a path, because the pine needles slide across the paper, making for a slippery, dangerous path.

If you have a large area to mulch, cardboard sheets are quicker to apply than newspaper.

I like to call this method cheap, lazy gardening. You make compost in place rather than hauling everything to your compost heap, then hauling the finished compost back to where you need it. You don't have to weed (much) come spring, and you don't have to dig (much) at planting time. When I use this method, I never till--ever. I just rake back the mulch, plant, and scoot the mulch back around the plants. Or, for veggies and other heavy feeders, I rake the mulch into my pathways, plant my row, and mulch with manure and/or compost. The remaining leaves help keep the path dry and weed-free. And everything you use is free.

If you don't have a ready supply of leaves like I do, consider picking up bagged leaves from the curb in front of your neighbors' houses. They won't care, and you'll get lots of free mulch. You could even be a good Samaritan and offer to rake leaves for elderly neighbors in return for the leaves.

Let's hear it for cheap and lazy!

Saturday, October 21, 2006

Moving plants into the greenhouse for winter

I haven't posted about my greenhouse adventures in ages. I got my first (and only) greenhouse a year ago June. Last year I wintered over a bunch of tender perennials sold as annuals, with mixed success. Petunias did very well, but a lot of the other stuff died (partly my fault for going too long between waterings and having inadequate air circulation in the greenhouse).

Fast forward to this year. I spent most of today moving stuff into the greenhouse, since our nights here in Portland are beginning to get cold. We've had frost in some areas already, though what we got at my place was more like slush and didn't kill anything off. But why tempt fate? So I got busy.

In addition to the citrus and brugmansia from last year, I have some bouganvilla and mandevilla. Plus, this year I'm trying an experiment. I dug up my bell peppers and jalapenos, potted 'em up, and moved them into the greenhouse. I don't expect them to bear during the winter, since I don't provide supplemental light, and I only keep the greenhouse heated enough to keep things from freezing. But I'm hoping to keep them alive so they can get an earlier start next spring. Plus I think it'll be cool to have shrub-sized pepper plants.

Monday, October 16, 2006

Grow a giant pumpkin next year!

This year I grew Atlantic Giant pumpkins for the first time. While large, mine were nowhere near world record holders, mostly because I didn't give them the daily TLC required to produce orange behemoths. If you do have the time and inclination to grow a pumpkin suitable for Cinderella's coach, you might want to check out the tips from Organic Gardening and start planning for next season. Good luck!

Sunday, October 15, 2006

Homemade sun-dried tomatoes: the perfect use for end-of-season tomatoes


Here in Portland, tomato season is winding down. I'm still getting a few slicers, but they often get mushy or icky before they fully ripen. So I pick them when they're pink and let them ripen on my counter. My cherry tomatoes are still ripening on the vine, but they often split before I get around to harvesting them. I think it's due to the wet, dewy mornings and occasional rain showers. Soon we'll have our first frost, and I'll need to pick all the decently-developed green tomatoes to ripen in the house. So, whether they're slicers or cherry tomatoes, what I'm harvesting now isn't of high enough quality for eating out of hand. But I hate to waste them. What to do?

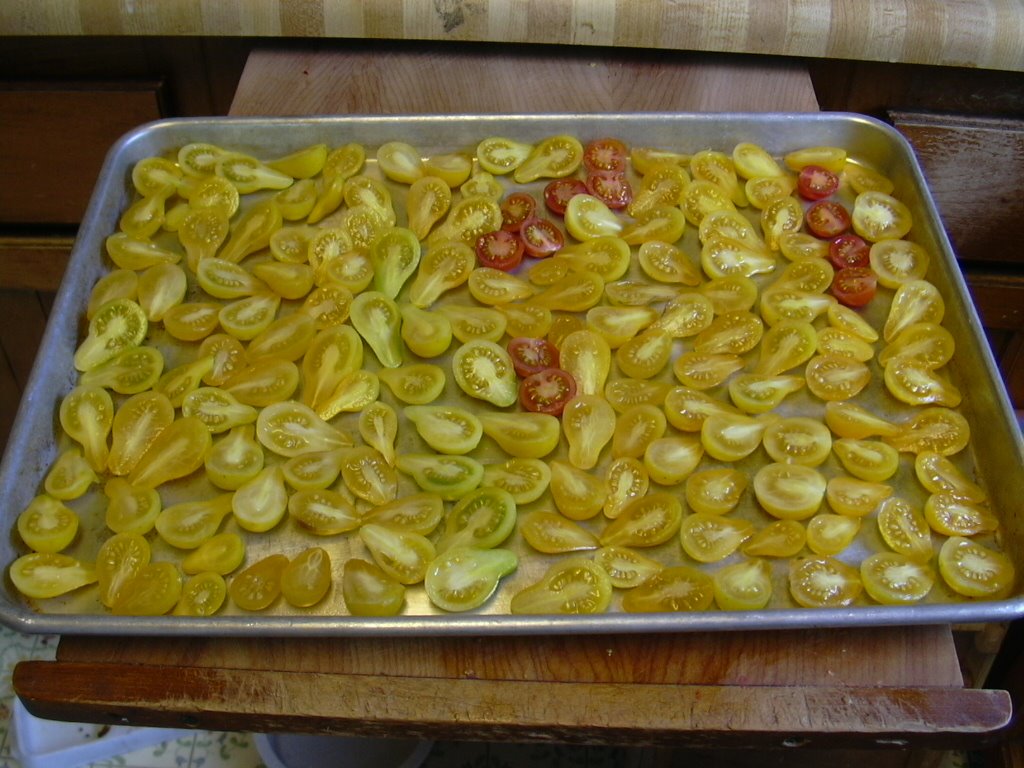
The most common answer is, make sauce! Yep, that works, but one can only use so much tomato sauce. And sauce isn't a practical option for cherry tomatoes, because it's way too much work to peel them. This year I tried something different -- drying them. The Cooking Inn has some good instructions, but I found a few problems with them. Their instructions for preparing cherry tomatoes are fine. But when I used their cooking temperatures, the tomatoes burned very quickly. I had better luck using lower temperatures for a longer period. Here's how I dried a boatload of cherry tomatoes, most of which were split but otherwise in good shape:

Homemade Sun-Dried Cherry Tomatoes
(Well, they're really oven-dried. What did you expect from an Oregonian?)
  1. Preheat oven to about 200-250 degrees
  2. Spray a baking sheet with non-stick spray or lightly grease with oil.
  3. Rinse cherry tomatoes and cut in half. Split ones are OK as long as they aren't discolored or starting to rot.
  4. Place tomatoes cut side up on baking sheet.
  5. Put tomatoes in oven and turn temperature down below 200. I recommend experimenting to get the right temperature. I had the best luck with my electric oven set a little below 200 with the door slightly ajar.
  6. Bake till dry but still pliable. I did mine till they were no longer sticky to the touch. You don't want to get them crunchy, because they'll be harder to use in recipes, especially pesto or something similar that has to be processed in a blender.
  7. Store them in jars with lids. You can pack them in oil (instructions available at the link mentioned above) or just store them dry.
Enjoy!